I've been re-grouting my kitchen and bathroom recently, not in itself something worthy of a blog post. However, I discovered a power tool to make the job far easier and since a few people have already asked me about it...
The MT3 made by CEL UK is an oscillating Multi Tool with all manner of different attachments, one of which is a carbide grout removal tool. The fact the tool oscillates (rather than rotates, say like a Dremel multi) means you don't fling the grout all over the house as dust. Vibrations from the tool are enough to remove grout and drop the majority of the mess neatly out of the joints in front of you.
I think at this point you probably already get the picture so here's a fun video of someone using the tool before I splurge out a bit more detail on it:
As you can see in addition to grout removal, it can be used for cutting but also sanding, rasping and probably a whole load of other tasks too. There's a bunch of other videos on the MT3 and other tools from CEL on their YouTube channel.
As an alternative, the known branded version of this thing is the PMF 180 E from Bosch. The best deal I found on the Bosch was at Amazon who sell the tool and large accessory pack together for just under 100 quid at the time of writing. This is more or less the same price as the MT3 from CEL so here's my logic for why I didn't go for the big name product.
Accessories are expensive for both products, but the Bosch is even more expensive than the CEL. However, the Bosch is only capable of using bits supplied by Bosch themselves where as the CEL is capable of using bits from pretty much anywhere, including Bosch (they include an adapter for Bosch bits). Given this and the fact the CEL is slightly more powerful I thought I'd go for supporting the small British startup company rather than the large German corporation and if CEL doesn't survive into the future I can always buy alternative bits for the tool from other manufacturers anyway.
Now I've mentioned CEL are a small British startup, it's probably a good point to say they successfully pitched on the Dragon's Den TV programme back in August 2010. You can see the designer and company MD, Chris Elsworthy, making his pitch on YouTube. However, it seems that ultimately CEL didn't accept the offer of investment.
Dealing with CEL while buying the tool was an absolute dream, one of the best Internet buying experiences I've ever had and really shows how the personal service you can get from a small company makes a difference. I wanted to buy the MT3-C Pack which at the time was advertised as "coming soon" and is made up of the MT3 Tool, accessory pack, and a case. Buying all 3 as a pack represented a saving of around £20.
I wrote to the generic sales email address on their web site asking when the pack might be available as I was interested in buying all 3 products together. Within half an hour I had a response back from their office saying they had all three parts, they were willing to put them together as a pack and honour the advertised pack price on the web site. This is where it gets really good, in addition they also sent through a PayPal invoice so should I wish to go ahead with the purchase I just had to complete the invoice and they would send the products out that afternoon for next day delivery! At this point it was a no-brainer, I returned the invoice and followed up via email too. Again, only half an hour later I had a response saying they had received the payment and sent the product out. 8:30am the next morning arrives and I've got my new tool, brilliant!
So far the tool and dealing with the company have both been great so I'm completely sold and wish CEL every success for the future and in creating some more great kit.
Tuesday 22 February 2011
Friday 11 February 2011
Building Native-like Web Apps for Mobile
 |
| Sencha Touch |
The first key decision in a project such as this is whether to go with a native application or an app delivered through the browser. Since in this particular case the people I was writing for all used iPhones, perhaps the natural choice would have been to write a native iPhone application. They could, however, just as easily have been using Android or a whole host of other devices. The real benefit of the native application (aside from speed perhaps) is the ability to interact with the hardware on the device your application will be running on. Since I did not require access to a camera, GPS, accelerometers or any other phone features, delivery through a web browser was a very realistic option. In giving up the ability to access these hardware features you gain the ability (if done carefully) to write-once run-anywhere. That is, the application I came up with would be able to run on an iPhone and Android or pretty much any device with a web-kit based browser and a decent touch screen interface, but at the cost of not being able to use, for example, a bar code scanner.
There are probably others but to the best of my knowledge there are currently three Javascript toolkits positioning themselves for the mobile space. Dojo Mobile, JQuery Mobile and Sencha Touch. Did I just say positioning for mobile space? Lucky you, if you're playing buzzword bingo, sorry! At the time of creation, Dojo and JQuery weren't options, they are both only now ramping up development in this area and in the case of JQuery releasing early alpha drops. Sencha Touch was much more advanced and already at a 0.90 beta when I first started playing with it. I followed it through the beta development cycle over the summer months in 2010. Fortunately, it seemed the timing of the production release of Sencha Touch was likely to be at the same time the first phase of my customer work went live so it became the obvious choice.
As a bit of background (and again this is my understanding so may not be absolutely accurate) Sencha was formed by the merger of JQ Touch and the EXT JS toolkit when the original author of JQ Touch, David Kaneda, joined forces with EXT development. Essentially, Sencha Touch is the next generation version of JQ Touch but now has a small army of developers, a community, and a company behind it to provide a support network.
I quite like the approach of delivery mobile apps through the web browser, where it's appropriate to do so of course. I've already discussed that in my view you can develop a web app in the browser if you don't need access to the device hardware. If you don't require that sort of access, it's hard to see why you'd want to develop any other way. As an Android user, I often get frustrated when apps (pointless or otherwise) are released only for the iPhone simply because that's what an iPhone user expects. One example I had recently was while reading through my subscription of BBC Good Food magazine who seem to provide only an iPhone or iPad application. In fact if you go to their web site they also provide a Chrome app and a Samsung Wave app, why I wonder? The magazine simply displays content with little or no interaction from the user, sure the online versions contain video and other features you can't put down on paper but there's nothing there to suggest the maintenance of a myriad of different apps for different mobile platforms is worthwhile. Not to mention my surprise that an organisation such as the beeb are carving up their community by device type rather than, as we'd expect, supporting the masses as we saw with iPlayer coming to Mac and Linux after their early Windows only versions. Surely, a javascript toolkit approach here would be better?
In the early days of my playing around with the Sencha Touch beta code I wrote a mobile version of a badminton web site I maintain. It's not particularly advanced and certainly not representative of all the things you can do with a toolkit like this but thought I'd put it out there anyway. It should, at the time of writing work with iPhone, iPad, Android and Blackberry devices and quite probably with others too. If you're trying on your desktop then make sure you're using a WebKit based browser such as Google Chrome or Safari, or for something a little bit different the great little browser Midori. For a better selection of demos take a look at the Sencha Touch Demo page and for a developer perspective on the widgets and options available in the toolkit have a look at their Kitchen Sink demo which gives a simple overview of many of the components.
Wednesday 8 December 2010
Killer Android Apps

Rather than bother myself considering which is the most useful, here's an alphabetical list of the apps I'm using right now. I'd love to hear what other people are using for similar things, there's so many good apps out there I'm sure to have not checked them all out.
Angry Birds (Game)
There's loads of games on the Android platform but this is the one I've spent most time playing. I'd be very surprised if you haven't come across it by now but if not then give it a go.
Barcode Scanner (Bar Code Scanner)
When I first got the phone I really didn't see the point of having a barcode scanner. It has, however, proven quite useful on occasion. I've yet to use it to scan any tangible product in a shop for example. Where it does come into its own is opening links from the web on your desktop in your mobile browser. I have, on more than one occasion, now come across sites that provide a QR code (2d bar code) that gives you a link to a web page or even better gives you a link directly to the right app in the marketplace.
eBuddy (Instant Messenger)
A multi-protocol instant messenger for Android. It connects to all the instant message services I use and gives me a nice way to increase the amount of time I spend logged into them so I can still be contacted even when not directly using a computer. I use a multi-protocol client on my desktop so it's great to find a decent one on the mobile platform which means you don't have to run individual apps for each of the services you want to log into.
ES File Explorer (File Manager)
The version of Android I have (2.2 from HTC) doesn't come with any sort of file manager or mechanism for installing APK files. ES File Explorer is excellent for both of these tasks. It's the best and most flexible file explorer I've come across but for some reason isn't the most popular or widely known/used. It has some neat advanced features such as the capability to connect to files over FTP/Samba and integrated bluetooth, etc. A real step up from any of the other file managers I've seen on Android.
Google Reader (Feed Reader)
As I write Google have just released the official app for their Reader service. It's definitely an improvement over the mobile version of Reader in the web browser so I'd recommend it just for that. However, it also seems to be (IMHO) better than other popular reader apps such as Feedsquares. Personally, Reader is the only internet based feed reader I use so having something integrated to it on my phone is fab.
Maps (Navigation)
Google maps in an app. You've almost certainly already seen it, but I still use it a lot and like it so it makes my list of useful apps.
RAC Traffic (Traffic/Navigation)
This is one area where I've not searched around much for other apps in the field. The RAC traffic app shows you where the traffic hot spots and problems are on roads in the UK. It's really useful to check this (when I remember to do so) before going off on a longer journey in order to help pick the best route that day. I'm sure it can't be the best app out there for this sort of thing so would be interested in hearing about others too.
Scrobble Droid (Social Music)
I find the last.fm service on the Internet a really useful way to discover music and share music with friends. I don't tend to use the last.fm clients to listen to music very much so that app doesn't feature on my list. However, this is a really tiny but useful app (more of a utility really) that will send the tracks you play in the Android music player to last.fm. This means anything I listen to on my phone gets added to my last.fm account and helps build my profile on the site.
Skype (Instant Messenger and VOIP)
Either you use Skype or you don't and you know what it is or you don't. The official client for Skype on Android seems to be pretty good to me and a neat way to make free calls to friends over your wireless network.
Todo List Widget (Productivity)
I've tried several todo list apps and widgets on Android but essentially wanted something stupidly simple that would literally just shove a list of stuff on the desktop and allow me to add/remove/tick off items as I deem necessary. Through a recommendation from a friend I found a widget called "Todo List Widget" which does just that, it's everything I wanted, very very simple and easy to use. If you want something advanced or more pervasive across devices this isn't the one for you, check out something like Remember The Milk instead.
TweetDeck (Social Client)
I've ditched the Facebook and Twitter apps in favour of using the same app on the phone as I do on the desktop. I've never experimented with Adobe Air but TweetDeck seems to be a great example built on that platform. I find TweetDeck much more usable than the other apps and it does seem to just work, is intuitive and nice to use. Once again a great user experience wins the day on the mobile platform.
Youtube (Video)
Ever tried watching videos in the web browser, they're rubbish right? The bulk standard youtube app sorts this out nicely, giving a much better view and size of the video and easy to use controls.
I found some other useful apps on my phone too that I have used briefly but can't necessarily recommend with the apps above because I've not used them extensively enough. These are "AndChat" for IRC related chats, it seems to be very similar to xchat but for Android; "c:geo" for Geocaching as it appears to be a fully functional geocaching app you can use out in the field while caching; and "Gesture Search" which is a Google app which allows you to very neatly search for things (apps, contacts, etc) on your phone via gestures.
In full Trevor McDonald style I'll sign off this post with an "And finally" thought... wouldn't it be really useful to have a social market place where you can suggest and rate apps to friends? The ratings system in the market place is all very well but isn't particularly relevant to me. My friends and contacts know me best and I respect their recommendations much more than a generic ratings system. This sort of functionality would certainly remove the need for this type of blog post entirely.
Tuesday 1 June 2010
Joggler Linux Boot Mysteries

EFI has its roots in Intel in the same way as a BIOS has its roots in IBM. Basically, it consists of a set of executables able to run within the simple environment EFI provides. These executables are just little computer programs that can vary extremely widely from talking to a piece of your hardware to providing you with a shell environment in which you can interact with EFI through to booting your operating system. This last function is quite important to us as computer users if we're to understand how EFI is used to start your machine, in this case your Joggler. A BIOS will boot your machine by looking at the master boot record and starting the boot loader that your installed operating system has put there; your operating system is responsible for booting itself. EFI does away with this, moving the responsibility for booting operating systems into the firmware interface itself, you no longer need a boot loader for your operating system. Instead, the boot loader is now just another EFI program that runs within the simple EFI environment I mentioned earlier.
You've been wondering what this FAT partition on your Joggler image is all about? FAT is just another file system like NTFS for Windows or ext for Linux, it's very widely understood so is commonly used these days on USB sticks but not necessarily many other places. If your disk is to be used to boot an operating system then EFI says you need a FAT file system as the first partition of that disk. EFI actually says FAT12 or FAT16 must be used for "removable media" so for us Joggler users with USB sticks or hard disks we should be using FAT16 even though EFI can understand FAT32 as well. You could boot any other disk from your FAT partition but all the simple Joggler cases would just involve booting an operating system somewhere else on the same disk i.e. the second partition.
Fortunately for us, when you start your Joggler its EFI looks both at its internal disk (the one with the O2 interface on it) and removable media (your USB disk). The FAT partition is discovered on your USB disk and by convention the file called startup.nsh is executed. This file is simply a script which can be used to execute any EFI script commands you wish. For Joggler USB booting it just runs a local script on your disk to start your boot loader EFI program.
So for the Joggler we might have something like this in startup.nsh on our disk in order to call the boot.nsh:
fs1:boot2

fs0:boot
And the following in the file boot.nsh to start the grub EFI boot loader program:
fs1:

grub
You now know what to do in order to boot your Joggler from a USB disk but the final missing piece to the puzzle is the EFI boot loader program itself. In the example above I used grub as the boot loader program. Yes, this is the same grub you're familiar with from booting Linux on BIOS based machines. However, in this example it's an EFI program so you'd be right to be wondering how you go about getting a copy of it. In my example here your FAT partition already has 2 files on it (startup.nsh and boot.nsh) and you'll need another 2 files (grub.efi and grub.cfg) to be able to boot your disk
There are two versions of grub. The old version, grub 1 or grub legacy as it's know known is not the one you want. You're looking for the current version which is (or will become) grub 2. At the time of writing grub 1.98 is the latest version, download the released version. Unfortunately, it doesn't work on the Joggler without applying a patch. So it's with thanks and reference to the guys over at Joggler Hacks I got my Joggler booting with my own grub 2.
To compile an EFI version of grub 2, unpack the source you've downloaded, then apply the Joggler grub 2 patch (using patch -p1), run ./configure --with-platform=efi and make. The compilation should proceed through to completion leaving you just finish off by making the grub EFI program. You can do this with ./grub-mkimage -d . -o grub.efi part_msdos hfsplus fat ext2 normal sh chain boot configfile linux. The file grub.efi will be created and you can copy this to your FAT partition.
The one remaining thing to do is create the grub configuration file. In grub 2 this is called grub.cfg and can be put in the root directory of your FAT partition with the other three files already there. If you've got your root file system on your second partition then the following should be enough for you to boot it:
 set timeout=0

menuentry "Linux" {

 set root=(hd0,1)

 linux /vmlinuz root=/dev/sda2 acpi=force ro idle=halt

 initrd /initrd

}
You can find a lot more of my information about the Joggler at my Joggler Index post. I also have a list of Joggler Bookmarks.
Sunday 30 May 2010
Upgrading Fedora 12 to 13
I have only a very slightly unusual setup in that I've got Fedora running on top of a hardware RAID environment which has caused some issues with preupgrade in the past. Upgrades I have tried on other equipment such as my work laptop have always been flawless and now it seems the issues with RAID installs have gone away too.
So this brings to an end my blog trilogy about upgrading Fedora, short and sweet, it just works! Now onwards to enjoy using a great new distribution that's pushing the boundaries in pretty much every area of Linux usage. Thanks to the Fedora team, Goddard looks fab.
Tuesday 25 May 2010
Pre-built Joggler Images
The Images
Easily the two most popular images are Ubuntu based although there are Joggler communities for Android, Mer and Meego, all of which are Linux based platforms. I've only tried the first of these but can lend my recommendation to either of
As I said, both are Ubuntu based with the key difference being the first image uses the Ubuntu Netbook Remix (a.k.a UNR, Ubuntu Netbook Edition and UNE) while the second one uses "normal" Ubuntu. You'd perhaps expect them to be in fierce competition with each other but in good open source spirit quite the opposite is true. Both are produced by nice guys who help each other (and the rest of the community out) by sharing what they do.
There's no sense in me reproducing how to download and use either of these images. Both come with pretty bullet-proof instructions on what to do. I would, however, heartily recommend you produce the images from a Linux system having recently helped a friend struggling with downloading the images successfully and finding the right tools to do the job under Windows.
Fair's Fair
From my own investigations and messing around with putting Fedora on the Joggler I can certainly vouch for the amount of time and effort these guys have put into producing such good quality, usable hacks. So, if you do more than just evaluate these for your own use i.e. you really are using your Joggler with either of these images then do give serious consideration to spending a few quid giving something back to the guys as they ask through a small donation. I have no idea how much they might stand to make through donation and other revenue such as the Google ads, but it's probably not a huge amount and is definitely well earned.
Modification
If you try the images out and there's something you don't like, fine, you don't have to stick with that particular quirk. There's never going to be a one-size fits all approach so if you don't like, for example, the on screen keyboard, the user interface or something else then feel free to change it. It's your system once you've downloaded and booted it after all. There are a lot of, dare I say, complaints on the forums about things not being quite right. If it's something major then let the guy know who produced the image, it will probably get fixed in their next version. Also, there's a huge wealth of help and support out there in various places so try looking for someone who's already "been there, done that".
Subject to some of the Joggler Hardware Gotchas it is possible to use these images on devices much bigger and faster than a 4GB USB stick. I've tried with an 8GB stick and USB hard disks from 80GB through 320GB and even one disk of 1TB. Simply follow the instructions for either image to write to your larger device as if it were a 4GB stick. Then use a tool such as gparted (again I recommend Linux simply because it's easy and the tools are readily available) to resize the second partition to be as big as you like. If you move to a hard disk (rather than USB stick) then you can undo some of the modifications made in the images for efficiency and to try and protect your stick:
- Change the file system back to ext3 from ext2
- Add a swap file or swap partition
Adding a swap file (if you don't know what this is then have a go at understanding paging)is probably easier in many ways than adding a swap partition and with a recent version of Linux such as the ones used in these images doesn't lead to any loss of performance as might have been expected in older versions of Linux. Feel free to add a swap partition in gparted though, don't forget to add a line to /etc/fstab to tell Ubuntu to use this partition as swap. To add a 1GB swap file simple run the command "dd if=/dev/zero of=/swap bs=1M count=1024; swapon /swap" then add a line to /etc/fstab so next time you reboot Ubuntu will use this file for swap space.
You can find a lot more of my information about the Joggler at my Joggler Index post. I also have a list of Joggler Bookmarks.
You can find a lot more of my information about the Joggler at my Joggler Index post. I also have a list of Joggler Bookmarks.
Friday 21 May 2010
Joggler Hardware Gotchas
GMA 500
Contrary to Intel's usual position with regards Linux support, the GMA 500 chipset is an absolute abomination. The basic reason for this is they license some of the technology from elsewhere so are unable to provide the full source code to the community. This means parts of the drivers for the GMA 500 chipset are binary only, cannot be shipped by any of the Linux distributions, so must be downloaded individually by each user. This driver is known as IEGD (Intel Embedded Graphics Driver).
There is an open source alternative known as PSB (or the Poulsbo driver). Support for this in the Linux distributions is patchy at best. Earlier versions of Ubuntu and Fedora have better support for this driver as it best supports earlier versions of Xorg, namely version 1.6.4 and below. The PSB driver has very recently been patched to support Xorg 1.7 and later so should soon start to work with Fedora 12 and above and Ubuntu 10.04. The patch was written by someone in the Mandriva community and has been made available for Fedora 12/13 by a Red Hat employee netbook enthusiast.
I have tried both drivers on Fedora 12. I was unable to get Adam's PSB driver to work (the akmod failed to compile) but I do have a fully working Fedora 12 graphical system using the IEGD driver. There will be more about how to get all that going in another blog post soon.
It's a shame the Joggler (and most netbooks) use this chipset. Before investigating you would think Linux would have superb support for Atom based netbooks given many of them have previously been sold with a Linux pre-install version. My guess is the lack of support for current distributions is why we don't see new Linux pre-install netbooks any more. This can only be due to demand though, Intel would support later versions if a vendor was willing to pay for support but the market has to be there in order to make this worthwhile (rant over).
USB power
The power provided by the Joggler's USB port is dodgy (technical term) at best. In order to support that claim I have tried several different USB hard disks (1 Lenovo, and 2 Freecom disks) and only non-bus-powered ones have worked reliably. The Joggler simply isn't able to provide enough power to operate these drives, two that I tried span up but didn't get enough power to move the disk heads, the third (a brand new Freecom mobile drive classic 2) does work but occasionally drops out causing the OS to crash. My recommendation is to provide an external power source if you're connecting much more than a USB stick to your Joggler.
Options then, well you can either mains power your device(s) or power from a USB hub. Either of these work reliably in my experience (I've tried a mains powered 3½" disk and powered hubs with my 2½" disks) but still there's one more problem. If your device passes power back into the Joggler itself, it wont boot and you'll end up in the O2 interface. You'll know if your device is doing this as the Joggler backlight will be lit even if the Joggler is not plugged into the mains! So now you have 2 options again, (1) stop your device passing power back to the Joggler, and (2) butcher a USB cable.
You can stop your device from passing power back to the Joggler (if it is doing so) by buying a decent powered USB hub. I'm using a Plexus hub I bought from eBuyer along with my Freecom disk. I have tried some cheaper powered hubs but they also passed power back to the host so while allowing me to connect multiple devices didn't solve the problem I was having.
The USB cable butchery option isn't as bad as it sounds. USB cables have 4 wires in them, white and green for data, black for earth and red for live. Simply grab the cable you want to connect your device with (whether it's the device itself or a cheaper powered hub which is passing power back to the Joggler), cut part of the outer sheath away (about an inch will do) somewhere along the cable length, find the 4 cables inside (getting through any braiding or foil that might be in your cable depending on how expensive it was), then simply cut the live wire. Make sure the live ends are not touching each other with some insulation and you can wrap the cable back up again. That's it, you've now got a Joggler compatible USB cable which wont pass power back to the Joggler but, obviously, wont power your device either. The Joggler is able to detect you've got a drive as part of the circuit is still there via the ground cable and data will flow as normal along the untouched data cables.
Partitioning
This observation is a real oddity for which I have no explanation (suggestions welcome). The Joggler will not boot from your USB device if it has 4 primary partitions, don't ask me why, yes it should work, but it just doesn't boot. Using 3 primary partitions works, up to 2 primary partitions, an extended partition and as many logical partitions as you like also works. But, give it a device with 4 partitions on and it's game over as far as booting from that device is concerned.
Usability
Some people have mentioned to me about not finding the touch screen very user friendly while running Linux. When compared with the O2 interface that's a pretty fair comment as things tend to be a lot smaller on Linux vs O2. There are various tweaks you can make to your desktop depending on your personal preference such as:
- finding an on-screen keyboard you're happy with (onBoard vs Cellwriter for example)
- increasing the font size such that all the things you want to touch (click on) are bigger (do this under System->Preferences->Appearance->Fonts in Gnome)
- installing touch screen addons for your programs (such as chromeTouch for Chrome)
- Make your scrollbars wider
You can find a lot more of my information about the Joggler at my Joggler Index post. I also have a list of Joggler Bookmarks.
Thursday 20 May 2010
Getting a Joggler, the how and the why?
So why do I, or you for that matter, want one? There's lots of different uses for it. Even if you look at it as a dumb wireless digital photo frame then it's far cheaper than other wifi frames out there. The neat thing about it is it runs a version of Linux internally, has a USB port and is also capable of booting from USB. This means you can run pretty much anything you like on there instead of the default O2 interface. So, it's the ideal hacking toy and can become a fully fledged computer system disguised as a photo frame if you choose to do so. The sky is the limit.
For me, I use it as a low power home server running:
- remote login to home (ssh)
- music streaming (squeezebox server)
- internet connected photo frame (gphotoframe)
- trivial internet browsing (chrome + touchscreen addon)
- file server (nfs, http, ftp, smb, etc as required)
- backup server (rsync)
I've also found it very useful to have a computer connected to my printer for wifi print serving from my laptop in the past. Currently the Joggler isn't located next to my printer so I'm not doing this but it's definitely an option for the future. Similarly I may eventually reconnect my current cost meter for home power monitoring, sending daily electricity bill via email, graphing and storing stats. Another use I could put it to is as a WOL client so wake up other machines in the house remotely so I don't leave them powered on all day (not that I do this anyway), but I haven't configured WOL yet.
Not investigated yet but it seems to me it should be possible to run the OpenPeak apps on Linux too. These are just flash applications so I should be able to run them on the Linux desktop without any issues which would provide me with the same functionality I would get from the original O2 interface under my own Linux.
You can find a lot more of my information about the Joggler at my Joggler Index post. I also have a list of Joggler Bookmarks.
Wednesday 19 May 2010
Joggler Index
This post will be kept up to date serving as an ordered index to my notes about the O2 Joggler; essentially a glorified digital picture frame with a touch screen. All posts will use the joggler tag too but these may appear in any order.

The very brief tech spec is:
- Intel Atom Z520 with GMA 500 chipset
- 512MB RAM
- 1GB Internal Storage (to run the O2 operating system and interface)
- 7 inch touch screen
- USB port, audio jack, wired Ethernet and wireless network
I have a list of Joggler bookmarks.
Blog Posts:
Thursday 25 February 2010
Letter to Altonians

People of Alton (and there abouts),
There is a battle raging in the town over whether the Coors Brewery should be permitted to sell their sports facilities (what's known as the Bass sports ground) near Anstey Park. Many of the local residents object to this for many reasons:
- there is a covenant on the current sports ground stating it should remain in use only for sport
- relocation of sports facilities to Anstey Park means massive loss of public green space in the town
- the coors site would be redeveloped as a supermarket or possibly dense housing
Why should the town lose a park so Coors can profit from land sales on which there is a covenant?
If you agree, you can find out more information from:
http://ansteyresidents.org.uk/
http://www.weloveansteypark.com/
http://saveansteypark.org.uk/
or the Facebook group
http://www.facebook.com/group.php?gid=299652801351
Things you can do to help:
Display the poster from the weloveansteypark.com web site
Object to the two planning applications concerned,
http://www.ansteyresidents.org.uk/object_to_footballhub.php
http://www.ansteyresidents.org.uk/object_to_supermarket.php
These campaigns are all fighting the same cause with the aim to protect our open spaces and ensure any development is sympathetic to the surrounding area and sited appropriately in the town.
Thanks for your time in reading this,
Graham White
Wednesday 24 February 2010
New Lens

My only other two lenses don't have a massive maximum aperture so it's great to finally have a fast lens in my arsenal. The benefit of greater lens speed is to widen the aperture which allows for throwing the background of your subject out of focus. This has the benefit of making the subject stand out and drawing the eye towards it. It's particularly great for portrait work.
The other great plus to this particular lens is it's just about the smallest, cheapest, lightest lens Canon make. This thing is tiny, weighs something like 130 grams and is less than 80 quid! It's just about the best bang-for-your-buck you can get in my opinion.
Usage is obviously quite simple as it's fixed focal length so there's no zoom ring to worry about. You only get a focusing ring and an auto/manual focus switch, no image stabilisation switch to worry about either. It does feel very strange to use at the moment though, because of it's size and weight it gives the camera a completely different feel. Not to mention that I'm used to zoom lenses so there's nothing to twist unless you're manually focusing. You have to move yourself in order to frame the subject as you want and while none of these things are bad, it does give a different feel to the experience of taking pictures. The results, though, speak for themselves, you can produce really great images from this lens which is a real shocker given the price.
Saturday 13 February 2010
High Dynamic Range (HDR)
Recently I've been playing around with creating HDR style images. I'll save the full technical explanation for someone else. In my own simple words for the uninitiated, it's a post processing technique where you combine multiple images of the same scene taken at different exposures. The reason for doing this is that your camera is only capable of "seeing" a certain range of light and colours, you usually tell it which range to use i.e. whether you want an underexposed or overexposed image. Some scenes are too mixed in terms of different light levels, you could expose for the dark areas or the light but perhaps not both. This is where a technique such as HDR comes in handy, allowing you to retain the detail in the shady areas as well as the well lit areas for example.
HDR images can look like they're not photographs, perhaps computer generated, depending on the algorithm used to render the final image. However, in the right hands they can look pretty cool, for example this one from the Flickr HDR Group:

I'm still very much learning, I've been working with these three images:


My best attempt so far is:

I think I've still got some way to go, but it's been fun trying and learning.
HDR images can look like they're not photographs, perhaps computer generated, depending on the algorithm used to render the final image. However, in the right hands they can look pretty cool, for example this one from the Flickr HDR Group:
I'm still very much learning, I've been working with these three images:
My best attempt so far is:
I think I've still got some way to go, but it's been fun trying and learning.
Thursday 4 February 2010
Contributing to BloGTK
At the end of last year I decided it was about time I filled in a scripting gap in my knowledge, namely Python, so set about finding something to code. I'm also a blogger (D'uh) and have always been frustrated at the lack of a decent off-line client for the Linux desktop. Enter BloGTK, both a blogging client and written in Python.
Step 1 before thinking any further about contributing or reading any source code is to seek permission from my employer. I was glad (and surprised) to find getting permission to contribute to open source projects is actually very quick and simple. A short note to my manager and a couple of days delay later yielded the rather simple response:
Graham
Approved
Regards, ...
BloGTK didn't do a couple of things I consider essential for my blogging purposes, the main one being support for uploading and embedding images. I wrote and submitted a couple of patches to the project, learning a lot about Python along the way. The latest development snapshot of BloGTK (which will probably become version 2.1) includes support for uploading to Picasa and Flickr. If you went looking for Flickr support as a result of my previous post then you'll either have to grab the development code early or wait a while until the release of the 2.1 version. In the mean time I'll do battle with Flickr to find out why they think BloGTK is a personal web site or gallery in order to publicise the App through the App Garden.
Tuesday 2 February 2010
Flickr Appgarden Violation, really?
Today I unexpectedly received the following from Flickr in reference to BloGTK.
I hold Flickr in very high regard for their openness, interaction with the community and the great API. This is also the reason I'm happy to sign up for a pro account vs other services I use heavily (such as Geocaching.com) which are a closed managed community. So I was surprised to find this note in my inbox this morning which appears to be an automated message or at best the staff member simply hasn't looked at the application before criticising and taking action.Hello, The App Garden is a place for software developers to showcase applications they've created. Because your app doesn't appear to fit this description it has been set to private. Your API key is still active and fully functioning , it's just not public in the App Garden. The App Garden is not a place to showcase a personal website or gallery. Please only publicize app pages for applications that you have developed and that are related to the Flickr API. You can review the App Garden guidelines here: http://www.flickr.com/services/apps/about/ Thank you for your understanding. Regards, Flickr Staff
Sunday 3 January 2010
Teach, Yourself
 I've recently had the opportunity to teach a class of students on a couple of different occasions. Something I've not done for quite a while now but something well worth doing every now and then. I say every now and then, I don't think I have the vocal stamina to do it for more than a few days and I especially don't think I have the special quality it takes to teach children. The classes were both very different, one a knowledgeable internal audience for a days course, the other a three day course for a customer where the participants were only a short way along the road towards learning what I had to say. Both were similar, on the topics of Linux cluster administration and all the various technologies it takes to run a cluster.
Clustering technologies really are varied and it takes a few years experience before an administrator has a good overview of the inner workings of how everything hangs together. For example, I mostly covered Linux administration and clustered administration with xCAT but to fully understand it you need a fair bit of background knowledge. Your Linux OS, hardware configuration and control, network architecture, storage, clustered file systems, remote management, parallel computing, computer service (NTP, DNS, FTP, NFS, HTTP, TFTP, etc) administration, etc. The list really is quite long and while this is starting to sound like a "Look at all the stuff I know!" blow-your-own-trumpet type blog post, the point I think I'm trying to make is the list of people who know (and I mean really know) all this stuff in any given company isn't very long. You'll know the guy, the one who everyone always asks when something is wrong with their machine, the "he fixes everything" guy. While these people are hard to find locked away in a small room somewhere (think IT Crowd), it can be even harder to teach the "I already know quite a lot" guy but I took up the challenge anyway.
There's nothing like teaching every now and then to keep you grounded. Some people in your class will challenge what you're saying so you have to make sure you're right and know how and why you're right, the how and the why are very important when teaching. Some times the class miss the point of what you said, this resets your view on the assumptions you make, the assumptions you work with every day. When someone in the class misses the point it's often to do with how you've expressed it rather than their lack of understanding. Some people might find this challenge to their knowledge of the fundamentals of what they work with quite stressful but I look at it as an opportunity. Sure, you might set yourself up for a fall but that's all part of the thrill. Fortunately, I don't mind speaking in front of a crowd, at least not about something with which I'm familiar, but the audience does add to the experience.
I can be a bit of a show-off, I know that, so teaching can be very satisfactory. Great for the ego, almost. However, I take great pleasure from imparting knowledge on others. The opportunity to help others understand something about which they previously knew little is not to be missed as far as I'm concerned. It plays to your inner show-off if you're prepared to stand on and risk falling off of the pedestal you put yourself on when you stand in front of a class.
If you're knowledgeable in a certain area then I would heartily recommend you share what you know in front of an audience, risk making a fool of yourself in front of your audience. I think the rewards are good if you don't often teach. Have what you know challenged. Have your assumptions highlighted. Find out the little gaps you didn't think you had. Most of all, have fun doing it.
Wednesday 30 December 2009
Macro Extension Tubes
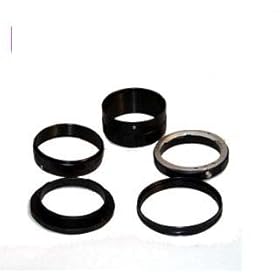 For Christmas I asked for (and was lucky enough to receive) a set of extension tubes for my camera. Having no experience with these before, I started off with the cheapest set I could find on Amazon. Whilst they're nowhere near as functional as the more expensive varieties available they are a decent starting point and would make a great present for any enthusiast.
For the uninitiated, Wikipedia has this to say about Extension Tubes:
An extension tube is an accessory for cameras with interchangeable lenses, used primarily for macro photography. The tube contains no optical elements; its sole purpose is to move the lens farther from the image plane. The farther away the lens is, the closer the focus, the greater the magnification.....
I don't mind using a cheap extension tube because it's just a hollow tube and has no effect on the quality of the image produced. The real disadvantage of this set and the reason they're at least £100 less expensive than the next set (and many hundreds of pounds cheaper than the Canon equivalent) is there are no electrical contacts, they're simply plain tubes. This means you're not able to control the aperture of the lens and must use manual focus; manual focus being no biggie since that's advisable with such a small depth of field.
Here are my first test images to see how they perform (click to see larger versions over on Flickr):


Both of these images were taken using my kit lens at 55mm and F5.6 hence the depth of field is so shallow on the magnified image with the tubes attached which also had a lot longer exposure in order to expose the image correctly.
For greater depth of field there are ways, not recommended by Canon I should add, you can change and lock the aperture of the lens before you add the extension tubes. This means if you're really desperate there's nothing stopping you getting a much better depth of field with these tubes at the expense of even longer exposure times of course.
For me, I think I shall experiment with these a little more. Should I catch the macro photography bug then I'll have to make a decision about whether to get a better set of extension tubes or even at some point treat myself to a proper macro lens. For now though, these will suffice quite nicely.
EDIT: My Amazon Review has now been published.
Upgrading Fedora 11 to 12
Everything progressed very smoothly, even more so than last time as I'm pleased to report the bug I had written about is now fixed. Fedora now detects hardware raid devices and employs the correct work-around solution to ensure the upgrade proceeds unhindered. So far so good then and I thought I would be sailing through to another smooth upgrade. However, it appears even at Fedora 12 level there are still some small issues as it proved later in the upgrade process.
This time the upgrade was smooth right through to the end of the upgrade process, after all the packages had been installed. Just as the bootloader config was being adjusted I was presented with a rather user-unfriendly Python stack trace with an "unhandled exception" error. By switching to another console I was able to work out the upgrade had in fact completed successfully all except for the final adjustments to the grub menu and removing the pre-upgrade cache. I reported this behaviour in a new Red Hat bugzilla bug report and have been informed this bug has already been fixed upstream in Fedora development and should not occur in pre-upgrade F12 to F13, lets wait and see.
So it seems the pre-upgrade path for slightly more complicated configurations such as the one I have at home is finally starting to look good. I'm slightly disappointed it's still not quite there yet though but all things considered this was another smooth upgrade and one which someone less informed about Linux might be successful.
Tuesday 17 November 2009
Upgrading Fedora 10 to 11
I upgraded both my home machines shortly after F11 was eventually released in early June after I had been tweeting about it for some time. Aside from a small problem with my main machine at home, both upgrades progressed seamlessly with the Fedora pre-upgrade tool. I'm a bit more conservative with my main work laptop usually staying 3 months behind the latest release, after eventually finding time to upgrade I've been running F11 on my laptop very smoothly for over a month now.
The issue I had upgrading my home machine was related to the fact my boot partition is on a (hardware) RAID device. It appears there is a bug in pre-upgrade in this area which I found out after a rare question to the fedora forums. In my experience pre-upgrade is pretty decent these days but beware that it still has some pitfalls such as this!
After pre-upgrade finishes your box reboots, in this case taking you from your F10 desktop to F11. All in all I've noticed very little difference between the two versions which raises some interesting questions for me, basically summarised by "What's the point in upgrading?". Having noticed very little difference after the upgrade this may well be a question many less experienced users ask too. On F10 my laptop worked flawlessly, I had compatibility with all the apps I need, accelerated 3d graphics with RandR 1.2 support (for easily switching between display devices), printing and some of the more traditionally contentious Linux functionality worked perfectly, namely wireless and suspend. F11 was exactly the same after my first boot into the system, flawless.
So what, indeed, is the point in an upgrade such as this? For me, I like to stay near (but in the case of my main machine not on) the bleeding edge of development. The upgrade for me was all about getting a few little extras in the Kernel (namely support for hard disk parking which I've not yet played with, and better web cam support) as well as all the little feature additions and bug fixes you get with every library and app you use on your box. The main point though, and the clincher, is that the upgrade process SHOULD be this smooth; these things SHOULD happen without causing any new problems while fixing as many old problems as possible. I'm glad to say F10 to F11 did work like this, it was a breeze, Fedora are getting this right and long may it continue.
Wednesday 22 July 2009
The Best Venn Diagram Ever
A colleague and good friend has this venn diagram printed out at work. I've been looking at it for ages and currently see it every day, I think it's fab...

I often describe my work role as "Professional Geek" and I suppose this diagram gives that some context. We all aspire towards intelligence (well most of us anyway) but most of the people I work with have a slightly obsessive enthusiasm about their subject matter that places us firmly in geek territory.
I can think of people I would place in each of these categories and I bet you can too. Which one are you?
Thursday 26 March 2009
Light Box for Peanuts
 Haha I'm funny, err yes well... I really have built a light box for peanuts inspired a while ago by Nick's tent. Although I have used it to take a peanut (right) it's built out of nothing more than stuff I had in the house already.
Aside from making it for next to nothing, I also wanted to allow it collapse so I don't have to store a huge empty box when it's not in use. Here's how I went about it, you'll be needing:


- For the box:
- 1 cardboard box (say about 12"x18" but that can vary depending on your use)
- 3 sheets of light diffuser (I used greaseproof paper, but tracing paper or white material will do nicely).
- Velcro (just a short length, say 6")
- A spine bar (long plastic paper binder thing)
- Sticky tape
- 1 cardboard box (say about 12"x18" but that can vary depending on your use)
- Tools:
- Scissors
- Craft knife
- Scissors
- Camera Kit:
- Camera and subject (D'uh)
- Tripod
- 2 or 3 lamps
- Camera and subject (D'uh)
Now it's time to get all Blue Peter...
Cut the box open at both ends. Seal one end back up again with a few little strips of velcro, leaving the other side open. I stuck packing tape onto the box first as the sticky velcro fixes better to that than cardboard. This will allow the finished box to collapse flat for storage. You should now have a box with a single opening so cut off any of the remaining flaps as you see fit, I just removed the top one and left the other three in place.
Cut three large holes, one on each side and one on the top, leaving a small border of about half an inch or so to fix to. Cut three sheets of your light diffuser about half an inch bigger than the holes in the box. Fix these over each hole with sticky tape.
I fixed a spine bar at the top back of the box. This will grip any sheets of paper/material you wish to use as a background to the photos you take in the box. So far though, as in the pictures above, I've found a simple sheet of white paper on the bottom has worked for the small objects I've taken (such as the peanut above). For best results, don't forget to white balance against your sheet of paper first.
Here's the velcro doing its job:

And the spine bar:

Friday 6 March 2009
Canon EOS 450d Updates
Further to my first post about my new camera and starter kit, I've just added a few more little bits to my starter collection. So here's what else I've got:
Card Reader (my Amazon review)
For years I've been using the older version of the reader I've just bought. They're both cheap as chips at under a fiver in spite of what price Amazon may have them up for now. However, the first worked so well and reliably I bought the new one. The difference? Simply that the new one reads SDHC where the old one didn't and I've just moved both my cameras onto SDHC now.
Blower
Not much to say here. Kept getting dusty/dirty lenses that I didn't want to wipe clean for fear of scratching. A blower appears to be the solution that works.
UV Filter (my Amazon review)
I already had one of these but got fed up of swapping between my two lenses so bought another. Sadly, they'd gone up in price quite a bit!
Remote Control (my Amazon review)
Probably the thing that spurred me on the most to order more stuff because I can't use 2 hands to take pictures right now. Also very useful for some ideas I have about getting close to some wild garden birds I'd like to capture.
This remote is made by a far Eastern company who have simply worked out how to interface to various makes of camera and put together their own set of controls. I would normally stick with Canon or other recognised makes but since this bit of kit has no bearing on the output of the camera I thought it worth a buy. Compared with a genuine Canon remote of the same price (the RC-1) it provides the same functionality but does it using a radio rather than an infra red link. This gives the advantages of using over much longer distances and without line of sight to the IR receiver on the camera. To get this capability from a Canon remote costs hundreds.
I've put more detail in my review on Amazon about this remote. However, in summary I would say you can tell it's cheap but it works well, not missed a click yet. It would probably work more effectively in the hands of a better photographer, but it does work.
Friday 27 February 2009
BT i-Plate
I discovered a new (but rather boring) gadget before Christmas reading through the Think Broadband news. The BT i-Plate could help speed up your ADSL connection so more recently I decided to grab one and try it out. It's marketed through BT Wholesale as a customer installable device so it's very simple to fit and costs less than a tenner to get it to your door. The cheapest I found was £9.29 inc delivery from Broadand Buyer.

 Any potential speed improvement results from reducing interference and improving stability at your master phone socket. The improvement seen by some people are staggering so worth a go I thought. The two pictures show before (left) and after (right) fitting. To fit you simply 1) remove the phone cord; 2) unscrew your master socket face plate and remove; 3) slot the i-Plate over the wire to the face plate; 4) plug the i-Plate into the master socket; 5) attach the face plate to the i-Plate and screw in. The socket now stands out from the wall about 1cm or so further than it did. Even with my right hand injured as it is, I managed to complete the installation quickly with one hand.
I did the installation a few days ago (Tuesday) so I've given it some time before comparing results before/after to allow my line speed to be adjusted (this is done automatically on all ADSL lines to keep your speed optimal for current conditions). So the big question is what has it done for me?
Before installation my ADSL router was connected at 5024kbps down and 448kbps up. This gave me an average download speed of 4352kbps and upload speed of 375kbps as measured by speedtest.net. Immediately after installation my connection speed had increased to 6016kbps up and 448kbps down, surprising. However, my download speed hardly changed at all. Today my router is connecting at 7008kbps and download speeds are around the 5200kbps mark using the same benchmark. It seems clear then, I've seen some improvement of around a 20% boost for downloads and hopefully a little more to come as my line stabilises with a little more time. Upload speeds remain the same as before on my "up to 8mbps/second" line, my current ISP is PlusNet.

 Any potential speed improvement results from reducing interference and improving stability at your master phone socket. The improvement seen by some people are staggering so worth a go I thought. The two pictures show before (left) and after (right) fitting. To fit you simply 1) remove the phone cord; 2) unscrew your master socket face plate and remove; 3) slot the i-Plate over the wire to the face plate; 4) plug the i-Plate into the master socket; 5) attach the face plate to the i-Plate and screw in. The socket now stands out from the wall about 1cm or so further than it did. Even with my right hand injured as it is, I managed to complete the installation quickly with one hand.
 I did the installation a few days ago (Tuesday) so I've given it some time before comparing results before/after to allow my line speed to be adjusted (this is done automatically on all ADSL lines to keep your speed optimal for current conditions). So the big question is what has it done for me?
Before installation my ADSL router was connected at 5024kbps down and 448kbps up. This gave me an average download speed of 4352kbps and upload speed of 375kbps as measured by speedtest.net. Immediately after installation my connection speed had increased to 6016kbps up and 448kbps down, surprising. However, my download speed hardly changed at all. Today my router is connecting at 7008kbps and download speeds are around the 5200kbps mark using the same benchmark. It seems clear then, I've seen some improvement of around a 20% boost for downloads and hopefully a little more to come as my line stabilises with a little more time. Upload speeds remain the same as before on my "up to 8mbps/second" line, my current ISP is PlusNet.
Tuesday 24 February 2009
Dear Wonky BT

Dear British Telecom, please when you send an engineer to my house to install a second line would you ask them to take as much care over presentation as getting the line working. Thanks, yours very wonkily!
This week we've had another phone line installed at home for reasons beyond comprehension. The young engineer was very concerned to take care to get things working as well as possible. However, he was only permitted to surface mount. That means any sockets or cables have to unsightly on the walls, not hidden or nicely recessed. Strange, as the first socket (on the left and also not straight) installed in our house before we moved in was recessed. I can live with that restriction perhaps, but is it unreasonable to expect better care over the position of the socket? I don't expect all engineers to be armed with a spirit level but this is just so clearly off level it's ridiculous.
Sunday 25 January 2009
Canon EOS 450d


I've recently had the dubious pleasure of turning 30 and having been considering investing in an SLR camera for quite some time decided this was the excuse I needed to splash out a bit. Amazon wish lists come in very handy, I just picked the stuff I wanted and saved to a list so people could just buy from that. My whole family were all very generous and all chipped in to get the following bits and pieces that now make up my starter SLR kit:
- Canon EOS 450D Kit (incl EF-S 18-55mm IS f/3.5-5.6)
- Canon EF-S 55-250mm f/4-5.6 IS
- SanDisk Extreme III SDHC 4GB Card
- Canon ET-60 Lens Hood
- Hoya 58mm PRO1 Circular Polarising Filter
- Hoya 58mm PRO1 UV Filter
- Lowepro Rezo 160 Shoulder Bag
- Lowepro Cirrus TLZ15 Case
This is my first venture into the world of SLR so I'll spare trying to do a full review and leave that to the pros. If you're interested, you can see the specs over at Canon and three pro reviews from sites I would recommend are Camera Labs, DP Review, and Steve's Digicams.
It was never really going to be much of a contest for me as to which brand and camera to go for since I've been using Canon compacts for years. When the 450d came out it immediately caught my attention as a very decent starter SLR and had the much reviewed live view feature that being a regular digital compact user I would expect to see. Now I've been using it for a while though I find I hardly rely on live view at all instead preferring the view finder. For me this actually feels quite retro - how often do you see a compact user with the camera up to their eye? This has a lot to do with the view finder in an SLR being far superior to those on compacts but also the live view is a lot clunkier to use. Using the SLR has made me realise just how fantastic and how much is packed into a decent compact camera like my current Canon A650 IS.
At the moment the starter kit I've got is fairly minimal but does provide the flexibility to take a lot of different shots while I learn how to handle and get the best results from the camera. I'm using the UV filter as a lens protector for the kit lens with the polariser on the long lens mostly. They're not much of a pain to swap, however, I think I'll end up getting a second UV filter for the long lens and swap in the polariser as required. The SD card is great, the Extreme III series have given me no problems in this or other cameras, would certainly recommend. The bags too are great, cheaper and more flexible than the Canon supplied bags and having a larger and smaller bag offers some good flexibility.
I'd welcome comments on other accessories I could get in the future. On my immediate list will be that second UV filter, a lens blower and cleaner, a remote shutter release and a light box (probably to be home made). Longer term I will consider other lenses, speedlights, a tripod upgrade, and possibly a spare battery although battery life is good on the 450d.
You can see my various attempts wit he 450d over on my Flickr pages.
Tuesday 20 January 2009
Eco-Wool Loft Insulation
 So now I'm cold, the reason being I've just been in our loft to take the most boring picture (right). But cold is good, right? That means my loft insulation must be working quite well on this cold winters evening. After my previous eco-minded post about our new LED light I thought I'd put up some info about another of our recent projects at home, insulating the loft.
It's a pretty simple job if somewhat cramped, dark and grim. It's well worth doing though as we can testify to having a warm house, cold loft, and doing well in the "who's roof melts the frost first" competition in our street. Loft insulation is supposed to be about the best bang-for-your-buck thing to do in terms of home efficiency; I've definitely noticed our radiators coming on a lot less. We're now up to a whopping 300mm insulation so well above the rafters and above what I still think is the recommended minimum of 250mm.
The real reason behind this post though is to say be careful when choosing what product you use. Don't just go to the local hardware store and buy the bulk standard "space blanket". Grand though it may sound those products are said to cause quite a lot of harm during manufacture. I've fitted Eco Wool (terrible web site, decent product) which is available in the UK through B&Q. While not the most ecological product ever (it uses 15% polyester for binding) it does use recycled plastic for the most part. It's very thick and has pretty good insulating properties, cheap and is easy to get hold of.
Unlike my post about our LED light I can't finish on any drawbacks with this one, there are none. Go insulate your loft, and think about what you lay first! Eco-warrior over and out.
Sunday 18 January 2009
LED Lighting

We're having a little bit of work done on the house and as part of that I had to move the outside light by the front door. On further inspection I found the old light wasn't going to cut the mustard in the new location, it wasn't going to be waterproof for one, which is sort of important. So a great excuse as if any were needed to buy something new and funky!
The obvious choice to me was to look into whether LED lights are available for outside lighting. Imagine my surprise when I found it seems they're actually getting quite commonplace and we were able to nip down to our local DIY store and pick one up. For some reason I was expecting to hunt around Internet sites and order one. The pictures shows what we bought. It's a fairly small chrome effect affair with two plastic panels beyond which are mounted a total of 24 white LEDs, 12 of these are at the front and 12 to the rear.
It provides plenty of light, not massively bright and offensive like security lighting, but easily enough to see your way up the drive to the doorway. The best part of this, as with all LED lighting, is the power usage. My current cost meter doesn't budge when it's turned on, not even a sniff of a change in power usage. Assuming I've not wired it up to some free electric supply I'm not aware of, or accidentally stolen from our neighbours, I can only conclude all 24 LEDs are using less than one watt of power. It's my first LED installation at home and almost certainly wont be the last.
I hate to finish on a downer but there are drawbacks of course. The LEDs are not replaceable so if one dies, however unlikely, you have to put up with it looking silly or replace the entire light. The other is the colour of the light, we've all been brought up with tungsten lighting so the colour of LED light does take a little getting used to.
Monday 12 January 2009
BBC iPlayer Coming to Linux

As the BBC recently announced they have developed a version of iPlayer that works on Linux, Windows and Mac: "The BBC, working with Adobe, has developed the new version, known as BBC iPlayer Desktop."
In a similar way (and name) to Google Labs, the BBC have come up with iPlayer Labs where they will trial the latest beta features for iPlayer before full release to the masses. This brings an exciting addition to current iPlayer capabilities, the iPlayer Desktop. Written for the Adobe Air platform, it works across all the supported operating systems and desktops, bringing the benefits of Air to the BBC developers. I think this is a safe and sensible choice for the BBC and should provide great functionality for we end users along with the slick Adobe interface. The reason this is exciting for Linux users is the desktop version brings the download capability, so no more 2nd class citizen for Linux users as we can now download the higher quality versions of BBC programming. Thanks Beeb!
If you want to give it a try, go to the iPlayer Labs page, click the link to say you would like to be a labs tester, then next time you attempt to download a programme, you'll be prompted to download and install the Adobe Air iPlayer bundle first. After that, just use the iPlayer desktop app in the same way as your other Air apps.
Friday 9 January 2009
Plusnet or Minusnet?
After coming back from New York in September, I uploaded my pictures to my personal web site. Nothing unusual for me there, except this time I realised I was nearly hitting the space limit my ISP enforces for my web space. At the time I figured all would be fine so I set about contacting them for a space increase. Now given I've been a customer for many years and always used their premium services (to get better speeds, more usage allowance and no traffic shaping) and the fact disk space is cheap (especially when talking in terms of MB) I even thought they'd probably give me more space at no charge. I hold Plusnet in reasonably high regard, customer service is great, network speeds are OK and things just seem reliable and work well, on this occasion though I was wrong. The conversation between me and Plusnet follows:
Graham
Plusnet
Graham
Plusnet
I find it hard to come to terms with the fact "their system" must be so terrible and essentially equate the response to the Little Brittain sketch "computer says no!".
This was all going on at the same time Roo was becoming frustrated with Plusnet as well. I can definitely sympathise with many of Roo's points and Plusnet have left me considering my options as well.
The reason I still maintain a web site is purely legacy. There once was a time when the likes of Flickr simply didn't exist and if you wanted to share photos on-line, you had to do it yourself. I'd quite happily move over to Flickr for hosting my pictures, it would be more convenient in a number of ways and sort of removes the need for hosting my own web site and therefore my tie to Plusnet.
It's got me thinking again recently, what services do I use/need and how much am I willing to pay for them. Currently my broadband is nearly £20 per month, with other providers I could get broadband, phone and television for that amount!!! Unfortunately, I don't live in an area catered for by cable services so I have to use ADSL broadband and non-cable phone/television.
If anybody has some good experiences or recommendations, do let me know as I start to look around now.
Edit #1
Since writing Plusnet have phoned me at home to discuss my requirements, another indication of their really excellent customer service. If I do decide to move away from them it will certainly be hard and with regret. Basically, I want something a bit cheaper with no speed restrictions and a sensible download limit if any. Plusnet offer only one service with no speed restrictions, the one I'm using already.
End Edit
Edit #2
As Roo pointed out in his post, Plusnet are using Twitter and search for people talking about Plusnet. They contacted me through Twitter to point out a relatively recent announcement about changes in their web hosting service which are currently under trial. Great stuff, weird how I only find this out through Twitter though, rather than through the formal methods of their helpdesk, through their community web site or by talking with them on the phone all of which I've done recently.
End Edit
Graham
Is it possible to increase my Web Space quota beyond 250MB?
My current usage is reported as 241MB, 96.4%. I use the web space primarily for my personal photographs which I resize to a small size and use JPEG compression so I'm not abusing the space. However, it seems after 8 years or so I'm now approaching 250MB.
Many thanks in advance for the information.
Plusnet
Dear Mr White,
I am afraid it is not possible to increase the webspace allowance on accounts at the present time.
Kind regards
Graham
That's really very unfortunate. Is there really no option to increase the 250MB quota, even if some charge were involved? I even pay a premium for the Your Way Pro service.
I'm a long-standing plusnet customer and one of the reasons I originally chose plusnet was for the web space and hosting of PHP+MySQL sites.
Are plusnet prepared to lose customers based on something this simple? If so, I'll have no choice but to re-evaluate my web hosting solution in which I will take into account my ADSL provider.
Hoping you can reconsider this decision or policy.
Thanks.
Plusnet
Dear Mr White,
Thank you for getting back to us. Unfortunately it is not possible to change the webspace allowance unless you were to move to our top business account. Our system does not allow us to add additional webspace and although we intend to offer this in the future we have no firm plans at present.
Kind regards
I find it hard to come to terms with the fact "their system" must be so terrible and essentially equate the response to the Little Brittain sketch "computer says no!".
This was all going on at the same time Roo was becoming frustrated with Plusnet as well. I can definitely sympathise with many of Roo's points and Plusnet have left me considering my options as well.
The reason I still maintain a web site is purely legacy. There once was a time when the likes of Flickr simply didn't exist and if you wanted to share photos on-line, you had to do it yourself. I'd quite happily move over to Flickr for hosting my pictures, it would be more convenient in a number of ways and sort of removes the need for hosting my own web site and therefore my tie to Plusnet.
It's got me thinking again recently, what services do I use/need and how much am I willing to pay for them. Currently my broadband is nearly £20 per month, with other providers I could get broadband, phone and television for that amount!!! Unfortunately, I don't live in an area catered for by cable services so I have to use ADSL broadband and non-cable phone/television.
If anybody has some good experiences or recommendations, do let me know as I start to look around now.
Edit #1
Since writing Plusnet have phoned me at home to discuss my requirements, another indication of their really excellent customer service. If I do decide to move away from them it will certainly be hard and with regret. Basically, I want something a bit cheaper with no speed restrictions and a sensible download limit if any. Plusnet offer only one service with no speed restrictions, the one I'm using already.
End Edit
Edit #2
As Roo pointed out in his post, Plusnet are using Twitter and search for people talking about Plusnet. They contacted me through Twitter to point out a relatively recent announcement about changes in their web hosting service which are currently under trial. Great stuff, weird how I only find this out through Twitter though, rather than through the formal methods of their helpdesk, through their community web site or by talking with them on the phone all of which I've done recently.
End Edit
Subscribe to:
Posts (Atom)