Wednesday 30 December 2009

Macro Extension Tubes

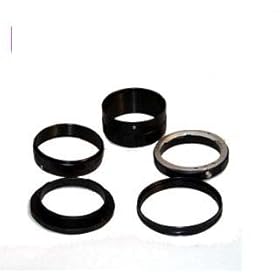
For Christmas I asked for (and was lucky enough to receive) a set of extension tubes for my camera. Having no experience with these before, I started off with the cheapest set I could find on Amazon. Whilst they're nowhere near as functional as the more expensive varieties available they are a decent starting point and would make a great present for any enthusiast.

For the uninitiated, Wikipedia has this to say about Extension Tubes:
An extension tube is an accessory for cameras with interchangeable lenses, used primarily for macro photography. The tube contains no optical elements; its sole purpose is to move the lens farther from the image plane. The farther away the lens is, the closer the focus, the greater the magnification.....


I don't mind using a cheap extension tube because it's just a hollow tube and has no effect on the quality of the image produced. The real disadvantage of this set and the reason they're at least £100 less expensive than the next set (and many hundreds of pounds cheaper than the Canon equivalent) is there are no electrical contacts, they're simply plain tubes. This means you're not able to control the aperture of the lens and must use manual focus; manual focus being no biggie since that's advisable with such a small depth of field.

Here are my first test images to see how they perform (click to see larger versions over on Flickr):
Two Pound CoinTwo Pound Coin


Both of these images were taken using my kit lens at 55mm and F5.6 hence the depth of field is so shallow on the magnified image with the tubes attached which also had a lot longer exposure in order to expose the image correctly.

For greater depth of field there are ways, not recommended by Canon I should add, you can change and lock the aperture of the lens before you add the extension tubes. This means if you're really desperate there's nothing stopping you getting a much better depth of field with these tubes at the expense of even longer exposure times of course.

For me, I think I shall experiment with these a little more. Should I catch the macro photography bug then I'll have to make a decision about whether to get a better set of extension tubes or even at some point treat myself to a proper macro lens. For now though, these will suffice quite nicely.

EDIT: My Amazon Review has now been published.

Upgrading Fedora 11 to 12

After writing recently about my previous upgrade experience, it seems fair to report my latest upgrade experience going from F11 to F12 using pre-upgrade on the same machine at home.

Everything progressed very smoothly, even more so than last time as I'm pleased to report the bug I had written about is now fixed. Fedora now detects hardware raid devices and employs the correct work-around solution to ensure the upgrade proceeds unhindered. So far so good then and I thought I would be sailing through to another smooth upgrade. However, it appears even at Fedora 12 level there are still some small issues as it proved later in the upgrade process.

This time the upgrade was smooth right through to the end of the upgrade process, after all the packages had been installed. Just as the bootloader config was being adjusted I was presented with a rather user-unfriendly Python stack trace with an "unhandled exception" error. By switching to another console I was able to work out the upgrade had in fact completed successfully all except for the final adjustments to the grub menu and removing the pre-upgrade cache. I reported this behaviour in a new Red Hat bugzilla bug report and have been informed this bug has already been fixed upstream in Fedora development and should not occur in pre-upgrade F12 to F13, lets wait and see.

So it seems the pre-upgrade path for slightly more complicated configurations such as the one I have at home is finally starting to look good. I'm slightly disappointed it's still not quite there yet though but all things considered this was another smooth upgrade and one which someone less informed about Linux might be successful.

Tuesday 17 November 2009

Upgrading Fedora 10 to 11

Writing on the day of the scheduled release of Fedora 12 it might seem strange to be talking about two previous versions. However, I thought I would take stock briefly looking over my shoulder before moving forward with the very latest and greatest.

I upgraded both my home machines shortly after F11 was eventually released in early June after I had been tweeting about it for some time. Aside from a small problem with my main machine at home, both upgrades progressed seamlessly with the Fedora pre-upgrade tool. I'm a bit more conservative with my main work laptop usually staying 3 months behind the latest release, after eventually finding time to upgrade I've been running F11 on my laptop very smoothly for over a month now.

The issue I had upgrading my home machine was related to the fact my boot partition is on a (hardware) RAID device. It appears there is a bug in pre-upgrade in this area which I found out after a rare question to the fedora forums. In my experience pre-upgrade is pretty decent these days but beware that it still has some pitfalls such as this!

After pre-upgrade finishes your box reboots, in this case taking you from your F10 desktop to F11. All in all I've noticed very little difference between the two versions which raises some interesting questions for me, basically summarised by "What's the point in upgrading?". Having noticed very little difference after the upgrade this may well be a question many less experienced users ask too. On F10 my laptop worked flawlessly, I had compatibility with all the apps I need, accelerated 3d graphics with RandR 1.2 support (for easily switching between display devices), printing and some of the more traditionally contentious Linux functionality worked perfectly, namely wireless and suspend. F11 was exactly the same after my first boot into the system, flawless.

So what, indeed, is the point in an upgrade such as this? For me, I like to stay near (but in the case of my main machine not on) the bleeding edge of development. The upgrade for me was all about getting a few little extras in the Kernel (namely support for hard disk parking which I've not yet played with, and better web cam support) as well as all the little feature additions and bug fixes you get with every library and app you use on your box. The main point though, and the clincher, is that the upgrade process SHOULD be this smooth; these things SHOULD happen without causing any new problems while fixing as many old problems as possible. I'm glad to say F10 to F11 did work like this, it was a breeze, Fedora are getting this right and long may it continue.

Wednesday 22 July 2009

The Best Venn Diagram Ever

A colleague and good friend has this venn diagram printed out at work. I've been looking at it for ages and currently see it every day, I think it's fab...


I often describe my work role as "Professional Geek" and I suppose this diagram gives that some context. We all aspire towards intelligence (well most of us anyway) but most of the people I work with have a slightly obsessive enthusiasm about their subject matter that places us firmly in geek territory.

I can think of people I would place in each of these categories and I bet you can too. Which one are you?

Thursday 26 March 2009

Light Box for Peanuts

PeanutHaha I'm funny, err yes well... I really have built a light box for peanuts inspired a while ago by Nick's tent. Although I have used it to take a peanut (right) it's built out of nothing more than stuff I had in the house already.

Aside from making it for next to nothing, I also wanted to allow it collapse so I don't have to store a huge empty box when it's not in use. Here's how I went about it, you'll be needing:

Light Box
Light Box
Light Box

  • For the box:
    • 1 cardboard box (say about 12"x18" but that can vary depending on your use)
    • 3 sheets of light diffuser (I used greaseproof paper, but tracing paper or white material will do nicely).
    • Velcro (just a short length, say 6")
    • A spine bar (long plastic paper binder thing)
    • Sticky tape

  • Tools:
    • Scissors
    • Craft knife

  • Camera Kit:
    • Camera and subject (D'uh)
    • Tripod
    • 2 or 3 lamps


Now it's time to get all Blue Peter...

Cut the box open at both ends. Seal one end back up again with a few little strips of velcro, leaving the other side open. I stuck packing tape onto the box first as the sticky velcro fixes better to that than cardboard. This will allow the finished box to collapse flat for storage. You should now have a box with a single opening so cut off any of the remaining flaps as you see fit, I just removed the top one and left the other three in place.

Cut three large holes, one on each side and one on the top, leaving a small border of about half an inch or so to fix to. Cut three sheets of your light diffuser about half an inch bigger than the holes in the box. Fix these over each hole with sticky tape.

I fixed a spine bar at the top back of the box. This will grip any sheets of paper/material you wish to use as a background to the photos you take in the box. So far though, as in the pictures above, I've found a simple sheet of white paper on the bottom has worked for the small objects I've taken (such as the peanut above). For best results, don't forget to white balance against your sheet of paper first.

Here's the velcro doing its job:


And the spine bar:

Friday 6 March 2009

Canon EOS 450d Updates

Further to my first post about my new camera and starter kit, I've just added a few more little bits to my starter collection. So here's what else I've got:
Card Reader (my Amazon review)
For years I've been using the older version of the reader I've just bought. They're both cheap as chips at under a fiver in spite of what price Amazon may have them up for now. However, the first worked so well and reliably I bought the new one. The difference? Simply that the new one reads SDHC where the old one didn't and I've just moved both my cameras onto SDHC now.

Blower
Not much to say here. Kept getting dusty/dirty lenses that I didn't want to wipe clean for fear of scratching. A blower appears to be the solution that works.

UV Filter (my Amazon review)
I already had one of these but got fed up of swapping between my two lenses so bought another. Sadly, they'd gone up in price quite a bit!

Remote Control (my Amazon review)
Probably the thing that spurred me on the most to order more stuff because I can't use 2 hands to take pictures right now. Also very useful for some ideas I have about getting close to some wild garden birds I'd like to capture.

This remote is made by a far Eastern company who have simply worked out how to interface to various makes of camera and put together their own set of controls. I would normally stick with Canon or other recognised makes but since this bit of kit has no bearing on the output of the camera I thought it worth a buy. Compared with a genuine Canon remote of the same price (the RC-1) it provides the same functionality but does it using a radio rather than an infra red link. This gives the advantages of using over much longer distances and without line of sight to the IR receiver on the camera. To get this capability from a Canon remote costs hundreds.

I've put more detail in my review on Amazon about this remote. However, in summary I would say you can tell it's cheap but it works well, not missed a click yet. It would probably work more effectively in the hands of a better photographer, but it does work.

Friday 27 February 2009

BT i-Plate

I discovered a new (but rather boring) gadget before Christmas reading through the Think Broadband news. The BT i-Plate could help speed up your ADSL connection so more recently I decided to grab one and try it out. It's marketed through BT Wholesale as a customer installable device so it's very simple to fit and costs less than a tenner to get it to your door. The cheapest I found was £9.29 inc delivery from Broadand Buyer.

Any potential speed improvement results from reducing interference and improving stability at your master phone socket. The improvement seen by some people are staggering so worth a go I thought. The two pictures show before (left) and after (right) fitting. To fit you simply 1) remove the phone cord; 2) unscrew your master socket face plate and remove; 3) slot the i-Plate over the wire to the face plate; 4) plug the i-Plate into the master socket; 5) attach the face plate to the i-Plate and screw in. The socket now stands out from the wall about 1cm or so further than it did. Even with my right hand injured as it is, I managed to complete the installation quickly with one hand.

I did the installation a few days ago (Tuesday) so I've given it some time before comparing results before/after to allow my line speed to be adjusted (this is done automatically on all ADSL lines to keep your speed optimal for current conditions). So the big question is what has it done for me?

Before installation my ADSL router was connected at 5024kbps down and 448kbps up. This gave me an average download speed of 4352kbps and upload speed of 375kbps as measured by speedtest.net. Immediately after installation my connection speed had increased to 6016kbps up and 448kbps down, surprising. However, my download speed hardly changed at all. Today my router is connecting at 7008kbps and download speeds are around the 5200kbps mark using the same benchmark. It seems clear then, I've seen some improvement of around a 20% boost for downloads and hopefully a little more to come as my line stabilises with a little more time. Upload speeds remain the same as before on my "up to 8mbps/second" line, my current ISP is PlusNet.

Tuesday 24 February 2009

Dear Wonky BT


Dear British Telecom, please when you send an engineer to my house to install a second line would you ask them to take as much care over presentation as getting the line working. Thanks, yours very wonkily!

This week we've had another phone line installed at home for reasons beyond comprehension. The young engineer was very concerned to take care to get things working as well as possible. However, he was only permitted to surface mount. That means any sockets or cables have to unsightly on the walls, not hidden or nicely recessed. Strange, as the first socket (on the left and also not straight) installed in our house before we moved in was recessed. I can live with that restriction perhaps, but is it unreasonable to expect better care over the position of the socket? I don't expect all engineers to be armed with a spirit level but this is just so clearly off level it's ridiculous.

Sunday 25 January 2009

Canon EOS 450d


I've recently had the dubious pleasure of turning 30 and having been considering investing in an SLR camera for quite some time decided this was the excuse I needed to splash out a bit. Amazon wish lists come in very handy, I just picked the stuff I wanted and saved to a list so people could just buy from that. My whole family were all very generous and all chipped in to get the following bits and pieces that now make up my starter SLR kit:

This is my first venture into the world of SLR so I'll spare trying to do a full review and leave that to the pros. If you're interested, you can see the specs over at Canon and three pro reviews from sites I would recommend are Camera Labs, DP Review, and Steve's Digicams.

It was never really going to be much of a contest for me as to which brand and camera to go for since I've been using Canon compacts for years. When the 450d came out it immediately caught my attention as a very decent starter SLR and had the much reviewed live view feature that being a regular digital compact user I would expect to see. Now I've been using it for a while though I find I hardly rely on live view at all instead preferring the view finder. For me this actually feels quite retro - how often do you see a compact user with the camera up to their eye? This has a lot to do with the view finder in an SLR being far superior to those on compacts but also the live view is a lot clunkier to use. Using the SLR has made me realise just how fantastic and how much is packed into a decent compact camera like my current Canon A650 IS.

At the moment the starter kit I've got is fairly minimal but does provide the flexibility to take a lot of different shots while I learn how to handle and get the best results from the camera. I'm using the UV filter as a lens protector for the kit lens with the polariser on the long lens mostly. They're not much of a pain to swap, however, I think I'll end up getting a second UV filter for the long lens and swap in the polariser as required. The SD card is great, the Extreme III series have given me no problems in this or other cameras, would certainly recommend. The bags too are great, cheaper and more flexible than the Canon supplied bags and having a larger and smaller bag offers some good flexibility.

I'd welcome comments on other accessories I could get in the future. On my immediate list will be that second UV filter, a lens blower and cleaner, a remote shutter release and a light box (probably to be home made). Longer term I will consider other lenses, speedlights, a tripod upgrade, and possibly a spare battery although battery life is good on the 450d.

You can see my various attempts wit he 450d over on my Flickr pages.

Tuesday 20 January 2009

Eco-Wool Loft Insulation

So now I'm cold, the reason being I've just been in our loft to take the most boring picture (right). But cold is good, right? That means my loft insulation must be working quite well on this cold winters evening. After my previous eco-minded post about our new LED light I thought I'd put up some info about another of our recent projects at home, insulating the loft.

It's a pretty simple job if somewhat cramped, dark and grim. It's well worth doing though as we can testify to having a warm house, cold loft, and doing well in the "who's roof melts the frost first" competition in our street. Loft insulation is supposed to be about the best bang-for-your-buck thing to do in terms of home efficiency; I've definitely noticed our radiators coming on a lot less. We're now up to a whopping 300mm insulation so well above the rafters and above what I still think is the recommended minimum of 250mm.

The real reason behind this post though is to say be careful when choosing what product you use. Don't just go to the local hardware store and buy the bulk standard "space blanket". Grand though it may sound those products are said to cause quite a lot of harm during manufacture. I've fitted Eco Wool (terrible web site, decent product) which is available in the UK through B&Q. While not the most ecological product ever (it uses 15% polyester for binding) it does use recycled plastic for the most part. It's very thick and has pretty good insulating properties, cheap and is easy to get hold of.

Unlike my post about our LED light I can't finish on any drawbacks with this one, there are none. Go insulate your loft, and think about what you lay first! Eco-warrior over and out.

Sunday 18 January 2009

LED Lighting


We're having a little bit of work done on the house and as part of that I had to move the outside light by the front door. On further inspection I found the old light wasn't going to cut the mustard in the new location, it wasn't going to be waterproof for one, which is sort of important. So a great excuse as if any were needed to buy something new and funky!

The obvious choice to me was to look into whether LED lights are available for outside lighting. Imagine my surprise when I found it seems they're actually getting quite commonplace and we were able to nip down to our local DIY store and pick one up. For some reason I was expecting to hunt around Internet sites and order one. The pictures shows what we bought. It's a fairly small chrome effect affair with two plastic panels beyond which are mounted a total of 24 white LEDs, 12 of these are at the front and 12 to the rear.

It provides plenty of light, not massively bright and offensive like security lighting, but easily enough to see your way up the drive to the doorway. The best part of this, as with all LED lighting, is the power usage. My current cost meter doesn't budge when it's turned on, not even a sniff of a change in power usage. Assuming I've not wired it up to some free electric supply I'm not aware of, or accidentally stolen from our neighbours, I can only conclude all 24 LEDs are using less than one watt of power. It's my first LED installation at home and almost certainly wont be the last.

I hate to finish on a downer but there are drawbacks of course. The LEDs are not replaceable so if one dies, however unlikely, you have to put up with it looking silly or replace the entire light. The other is the colour of the light, we've all been brought up with tungsten lighting so the colour of LED light does take a little getting used to.

Monday 12 January 2009

BBC iPlayer Coming to Linux

BBC iPlayer Logo
As the BBC recently announced they have developed a version of iPlayer that works on Linux, Windows and Mac: "The BBC, working with Adobe, has developed the new version, known as BBC iPlayer Desktop."

In a similar way (and name) to Google Labs, the BBC have come up with iPlayer Labs where they will trial the latest beta features for iPlayer before full release to the masses. This brings an exciting addition to current iPlayer capabilities, the iPlayer Desktop. Written for the Adobe Air platform, it works across all the supported operating systems and desktops, bringing the benefits of Air to the BBC developers. I think this is a safe and sensible choice for the BBC and should provide great functionality for we end users along with the slick Adobe interface. The reason this is exciting for Linux users is the desktop version brings the download capability, so no more 2nd class citizen for Linux users as we can now download the higher quality versions of BBC programming. Thanks Beeb!

If you want to give it a try, go to the iPlayer Labs page, click the link to say you would like to be a labs tester, then next time you attempt to download a programme, you'll be prompted to download and install the Adobe Air iPlayer bundle first. After that, just use the iPlayer desktop app in the same way as your other Air apps.

Friday 9 January 2009

Plusnet or Minusnet?

After coming back from New York in September, I uploaded my pictures to my personal web site. Nothing unusual for me there, except this time I realised I was nearly hitting the space limit my ISP enforces for my web space. At the time I figured all would be fine so I set about contacting them for a space increase. Now given I've been a customer for many years and always used their premium services (to get better speeds, more usage allowance and no traffic shaping) and the fact disk space is cheap (especially when talking in terms of MB) I even thought they'd probably give me more space at no charge. I hold Plusnet in reasonably high regard, customer service is great, network speeds are OK and things just seem reliable and work well, on this occasion though I was wrong. The conversation between me and Plusnet follows:

Graham
Is it possible to increase my Web Space quota beyond 250MB?
My current usage is reported as 241MB, 96.4%. I use the web space primarily for my personal photographs which I resize to a small size and use JPEG compression so I'm not abusing the space. However, it seems after 8 years or so I'm now approaching 250MB.
Many thanks in advance for the information.

Plusnet
Dear Mr White,
I am afraid it is not possible to increase the webspace allowance on accounts at the present time.
Kind regards

Graham
That's really very unfortunate. Is there really no option to increase the 250MB quota, even if some charge were involved? I even pay a premium for the Your Way Pro service.
I'm a long-standing plusnet customer and one of the reasons I originally chose plusnet was for the web space and hosting of PHP+MySQL sites.
Are plusnet prepared to lose customers based on something this simple? If so, I'll have no choice but to re-evaluate my web hosting solution in which I will take into account my ADSL provider.
Hoping you can reconsider this decision or policy.
Thanks.

Plusnet
Dear Mr White,
Thank you for getting back to us. Unfortunately it is not possible to change the webspace allowance unless you were to move to our top business account. Our system does not allow us to add additional webspace and although we intend to offer this in the future we have no firm plans at present.
Kind regards


I find it hard to come to terms with the fact "their system" must be so terrible and essentially equate the response to the Little Brittain sketch "computer says no!".

This was all going on at the same time Roo was becoming frustrated with Plusnet as well. I can definitely sympathise with many of Roo's points and Plusnet have left me considering my options as well.

The reason I still maintain a web site is purely legacy. There once was a time when the likes of Flickr simply didn't exist and if you wanted to share photos on-line, you had to do it yourself. I'd quite happily move over to Flickr for hosting my pictures, it would be more convenient in a number of ways and sort of removes the need for hosting my own web site and therefore my tie to Plusnet.

It's got me thinking again recently, what services do I use/need and how much am I willing to pay for them. Currently my broadband is nearly £20 per month, with other providers I could get broadband, phone and television for that amount!!! Unfortunately, I don't live in an area catered for by cable services so I have to use ADSL broadband and non-cable phone/television.

If anybody has some good experiences or recommendations, do let me know as I start to look around now.

Edit #1
Since writing Plusnet have phoned me at home to discuss my requirements, another indication of their really excellent customer service. If I do decide to move away from them it will certainly be hard and with regret. Basically, I want something a bit cheaper with no speed restrictions and a sensible download limit if any. Plusnet offer only one service with no speed restrictions, the one I'm using already.
End Edit

Edit #2
As Roo pointed out in his post, Plusnet are using Twitter and search for people talking about Plusnet. They contacted me through Twitter to point out a relatively recent announcement about changes in their web hosting service which are currently under trial. Great stuff, weird how I only find this out through Twitter though, rather than through the formal methods of their helpdesk, through their community web site or by talking with them on the phone all of which I've done recently.
End Edit